
CloudRC AdvenX3 Test guide
Update20250110
Added mini receiver connection instructions
Update20241108
Added APN configuration guidance
Update20230329
Add Steering wheel test guide video
Update20230218
Add AdvenX3 connection block diagram
Update20230208
Add the picture indication of ESC channel connection of receiver servo
Update 20230207
Add SIM card and antenna installation instructions
Update 202212251945
"CloudRC recommends that you install AdvenX3 on your off-road vehicle like traxxas trx4/trx6. Because of the latency associated with Internet communication, lower speeds are a better experience. Of course, if there is a relatively large place, the high-speed car is no problem. It just takes some practice to get used to driving this way."
1. Overview
The AdvenX3 test work is mainly to confirm the network access function of the local 4G network and the reliability of video transmission. Once the functional tests are working, you can install to RCCAR for full testing.
2. Preparation
(1)AdvenX3x1
(2)2S/3S lithium battery x1
If the battery does not have a balanced charging cable connector, then you will need to make your own power supply to power the AdvenX3.
(3) Mobile phone x1
Used to install the CloudRC APP and test that AdvenX3 is working.
4.Tools
If you need to do some cable making, then you need the corresponding tools.
(5) Good mobile WIFI network and 4G signal
3. Minimize system testing
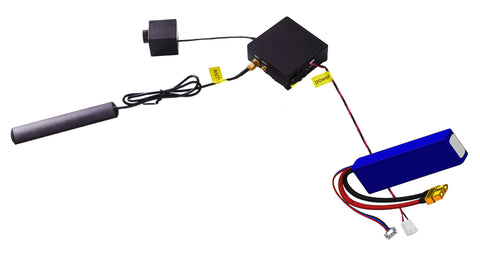
(1) Minimize system cable connections
Minimizing system testing only requires the AdvenX3's 4G antenna and power supply to be properly connected.
(The SIM card type is MicroSIM.
Please pay attention to the orientation of the SIM card and insert it as shown below.
If you need to take it out, press the SIM card into it and it will automatically pop out. Do not pull it out too hard, it may damage the SIM card connected to the machine.
In addition, the 4G antenna must be properly connected, and the 4G antenna is connected to the interface ANT1 near the edge side. The GPS antenna is connected at ANT0.)
If the SIM card is inserted correctly but the AdvenX3 voice is not connected to the Internet. Then it may be necessary to configure the correct APN.
Please visit this link
How to configure the APN of cloudrc AdvenX3?

As shown here
First connect the Power cable to the AdvenX3 Power interface
(Note: There are two power cables in the AdvenX3 accessory, balanced charging connectors for the 2S and 3S batteries. If your battery does not have a balanced charging connector, you will need to make your own power supply cable. Cut the power cord to connect it to your power supply or battery. Red is positive, black is negative. The supply voltage is recommended to be between 6.5V-12.6V, and the voltage monitoring function can work normally in this range.)
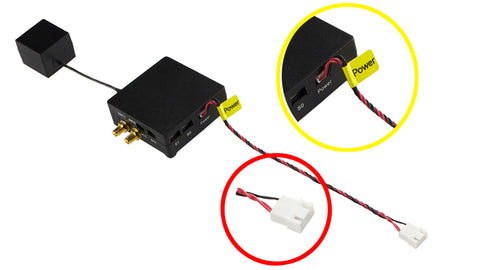
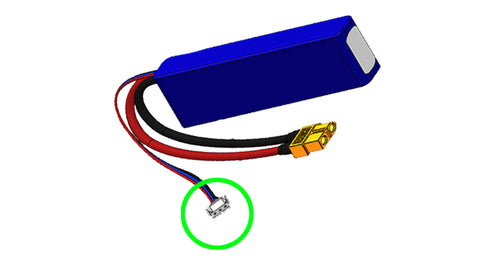
Battery with balanced charging cable connector
Then connect the 4G antenna to the ATN1 interface
(2) Power on test
Always check whether the power cable is properly connected, especially the positive and negative electrodes and the supply voltage before switching on.
If there is no problem, power on AdvenX3.
The red indicator light is the power indicator light, which is always on.
The blue indicator is the system service indicator, which flashes once per second to indicate successful startup.
(3) Test network and video
This is an important step and may require some configuration to work properly.
①Binding to AdvenX3
1) Download and register the CloudRC APP
2) Scan the AdvenX3 QR code binding using CloudRC
Before scanning the QR code, make sure that the AdvenX3 is powered on and the blue light flashes once per second.
② Test video
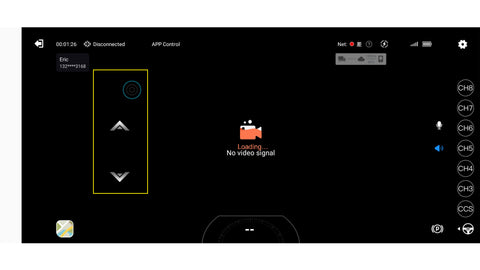
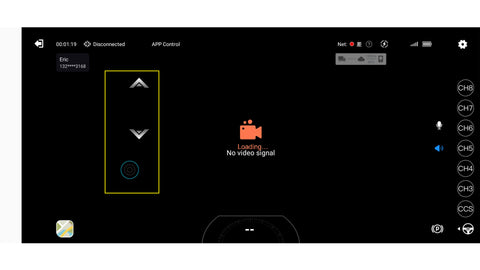
1) Open CloudRCAPP and click Start driving
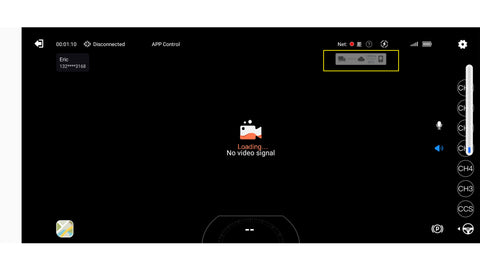
Click to start driving to enter the operation interface and check whether the video stream is smooth.
If not, look at the interface network delay indication.
(1) In general, CloudServer delay in < 100ms, mobile -> CloudServer latency < 50ms, and the delay fluctuates in a small range, if the delay fluctuates too much, the network is not good)
Manually switch servers, choose a Server that is close to you, or if you are not sure, choose a Server with lower latency, and check if the video is smooth (it may take a minute, so be patient).
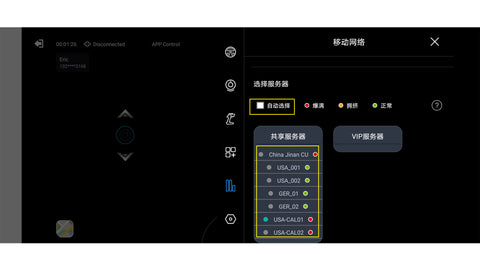
If the latency between 4G and your phone network is within reasonable limits, but the video isn't smooth, then the definition may be too high and you can try switching to a different definition (switching definition may require you to re-enter the driving interface). Hd is generally recommended, depending on your 4G network.

2) If you still can't solve it, send an email to us, and we will check together.
4. Full function test of AdvenX3
The full function test mainly includes video/voice/control.


(1) Video voice function
Video function: Observe whether the video is smooth on the APP
Pick up function: open the speaker icon on the APP and speak to AdvenX3
Speech function: Press and hold the microphone icon on the APP to select a shout or enter a text
(2) Control function
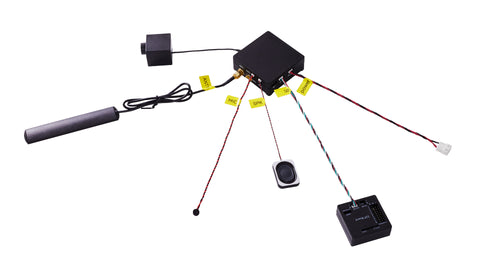
The control of the external electronics by AdvenX3 is achieved through the 8-channel receiver of AdvenX3.
When CloudRCAPP is turned on and the driving interface is entered, the receiver channel indicator LED1-8 will all light up.
Connect to the AdvenX3 receiver
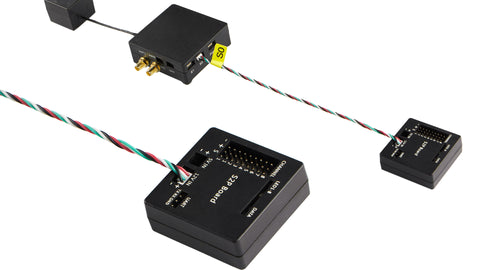
② The receiver is connected to the ESC
Pay attention to the order of the signal line, the reverse connection can not work or even damage the equipment.
Please refer to the picture below and confirm that the wiring is correct before proceeding to the following steps.


ESC is connected for the first time, and the throttle of ESC needs to be calibrated. Please refer to the corresponding ESC manual for calibration. If not calibrated, it may not be possible to advance or retreat or automatically advance or retreat.
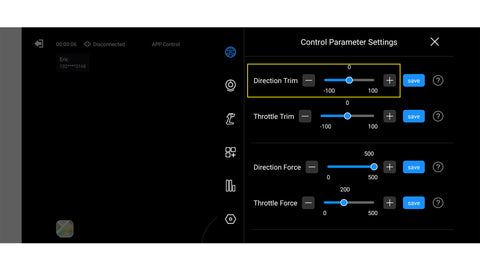
Before ESC calibration, please set and save the following parameters in the APP according to the diagram.

ESC calibration requires pushing the throttle to the maximum, minimum, and median values, as follows.
The left side of the default screen is the throttle control area. Hold down any area on the left side of the phone screen and push it up to the maximum, which is the maximum forward throttle.
Press and hold any area on the left side of the phone screen, push down to the maximum of the throttle reverse maximum, and release the throttle to 0
If the throttle needs to be reversed

③ The receiver is connected to the servo
Note that the AdvenX3 receiver channel is not externally powered, but is powered by the ESC, and the test servo needs to be powered on by the ESC for testing.
1) Connect the steering Servo
If the direction of the steering Servo needs to be adjusted after installation, it can be fine-tuned by CloudRCAPP. After adjustment, it will be saved and effective.
If the steering needs to be reversed, follow the diagram
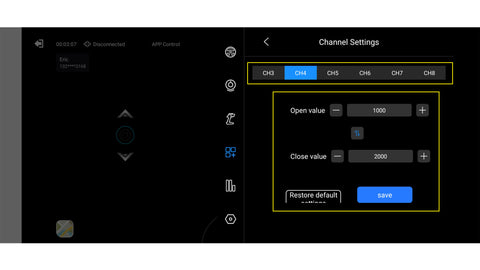
2) Connect other servos
If you have more servos on your RCCAR, connect to channels 3-8 and configure the parameters in CloudRCAPP to make the servos react correctly, such as high/low speed switch of the shift box, differential lock switch, etc.
5. Final test
If everything works, then you can install AdvenX3 on your RCCAR and test it.
Here is a tutorial on how to install CloudRCAdvenX3 into RCCAR. Take TRX4 as an example, other models you can refer to.
5. Steering wheel test
If the tests worked, and you have the CloudRC Gamebox and the steering wheel. Then you can check out the video below.
Please note:
The steering wheel models currently supported are:
Logtich G29
thrustmaster T150 T300RS
If you have another model of steering wheel, please contact us before purchasing the CloudRC Gamebox.


